5 Awesome Crafts for Kids Using Dixie® Cups!

Thank you Dixie® Cups for sponsoring this post. Check out how versatile these 5 oz. multi-purpose cups are!

Thank you Dixie® Cups for sponsoring this post. Check out how versatile these 5 oz. multi-purpose cups are!

With the kids home more often, so many parents are looking for ways to keep their kids entertained and busy! I’m sharing 5 fun arts & crafts activities that you can easily do with kids using Dixie® multi-purpose 5 oz. cups! We always have them in our home and I love how versatile they are. We use them as snack cups for the kids, water cups while we’re at the park, we make popsicles with them in the summer, and they can also be used for arts & crafts! They’re an easy way to prevent the spread of germs and, especially now, that’s definitely a priority for every parent! 

They’re designed to last and perform, which comes as no surprise since they’ve been around for over 100 years, so they’re the perfect cup to use with kids! They’ll hold their shape, are the perfect size for their hands, they easily stack inside of each other to pack on-the-go, they won’t break when your toddler drops them on the floor, and they come in the most stylish colors and patterns!

I rounded up our 5 favorite crafts for kids using Dixie® multi-purpose 5 oz. cups that will promote fine motor skills, dexterity, counting, letter recognition, and more! 

Counting Caterpillar
IMG_1361.JPG

What you’ll need: 

  • Pipe cleaner for the antennas

  • Eyes and a nose, or markers to draw them on

  • Long piece of string

Start by making the face of your caterpillar on a Dixie® cup with markers or pompoms, or any other items you have! With a pair of scissors, make 2 holes on the top and loop the antenna pipe cleaner through! Take a piece of tape and secure the thread inside the caterpillar’s head.

Now for the body! Take a marker and draw a number on the side of each Dixie® cup. We did numbers 1-10, but if your child is older, you can add more! With a pair of scissors, pierce a hole in the bottom of each Dixie® cup.

IMG_1354.JPG

My son is only 3, so I did a lot of the prep work myself, but if your child is older, they can help write out the numbers and make the face on the caterpillar!

Now, it’s time for your child to practice their numbers! Give them the caterpillar’s head and string and ask them to add the cups in order, starting at #1, by pulling the string through the hole on the bottom of each Dixie® cup! This is an activity you can do over and over again. When they finish adding all the cups to the caterpillar’s body, you can take them off and store them away for another day.

DSCF3595.JPG
IMG_1352.JPG
Classic Telephone
IMG_1357.JPG

This is one that I’m sure you all remember from when you were younger! Your kids will love decorating the cup and will be amazed that they can hear your voice through the Dixie® cup.

What you’ll need: 

Decorate your Dixie® cups to start. Pierce a hole in the bottom of each cup and insert your string through the hole and knot it so it won’t slip out. That’s it!

Music Shaker
IMG_1367.JPG

What you’ll need: 

IMG_1366.JPG
IMG_1365.JPG

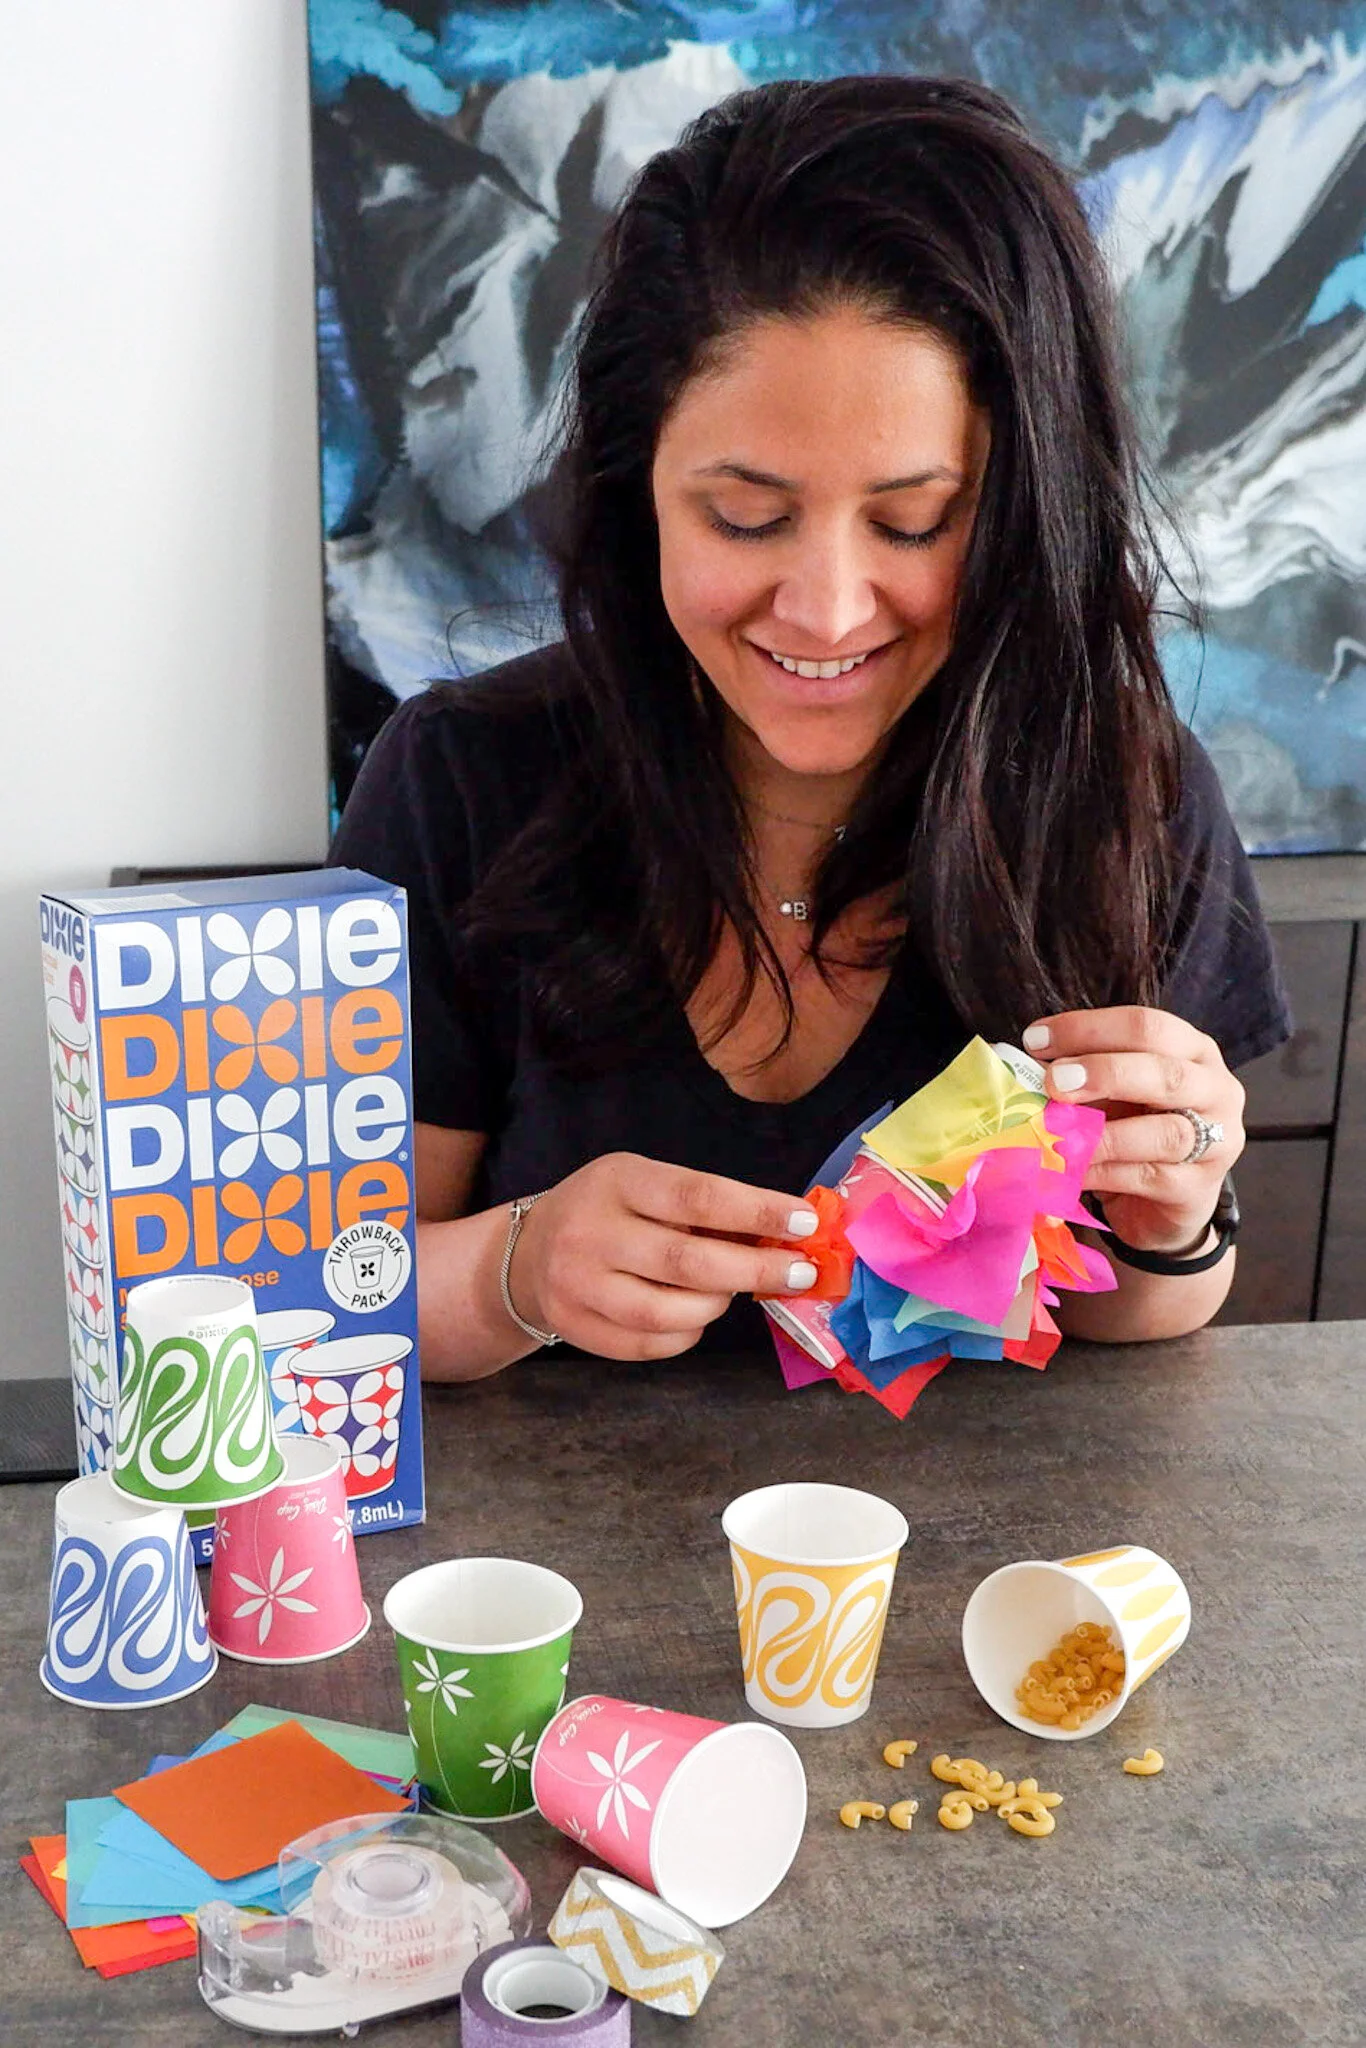
Decorate both cups with the art supplies that you have! Fill up one cup halfway with the uncooked macaroni. You can turn this into a counting game by asking your child to count how many they are putting in. 

Tape another cup on top of the one with the macaroni and make sure they are well secured together. 

Add some final decor to your shaker and you’re ready to dance!

IMG_1353.JPG
IMG_1358.JPG
Flower Pot
IMG_1362.JPG
IMG_1364.JPG

This craft is great for dexterity and fine motor skills. It seems like such a simple craft, but it will keep your kids busy and entertained! 

What you’ll need: 

Start by making holes in the Dixie® multi-purpose 5 oz. cups with scissors or with a hole punch. You can do them only along the rim or all over the cup. 

IMG_1355.JPG
IMG_1356.JPG

Decorate the Dixie® cup and then ask your child to take the pipe cleaners and weave them in and out of the holes that you made on the cup. This is a really great activity that will have them concentrating and practicing so many different skills. Once they’ve finished, you can make some flowers with pipe cleaners, or you can go outside and pick some real ones!

IMG_1363.JPG
Alphabet Tower
IMG_1360.JPG

What you’ll need: 

Start by asking your child to draw or paint a letter on each of the Dixie® multi-purpose 5 oz. cups. If they’re too young to write, then you can draw the letter! You can also decorate the cups if you’d like, but I find them so nice looking as is!

Next is the fun part. Build a tower, build a fort, or stack them one on top of the other — as long as they’re doing it in the order of the alphabet! This is a great way to make practicing the alphabet fun. You can do it with upper or lowercase letters, or a mix of both. 

I hope your children love these crafts as much as mine do! We always make sure to have Dixie® multi-purpose 5 oz. cups at home for all our daily needs! Whether you’re doing a craft or using it to give snacks to your kids, they’re a simple and easy way to prevent germs from spreading so you can focus more on your family and worry less about keeping them safe. They will really give you peace of mind, which is something that we could all use a little more of. 

DIY Mother's Day Handprint & Footprint Gifts

We LOVE DIY crafts (well I do at least... Zane loves to play with paint - so it's a win-win) and what better time to make one than Mother's Day? All moms LOVE DIY crafts from their kids and even more so from their grandkids! Zane and I got to work and created the most adorable gifts for his Grandma and Great-Grandma this Mother's Day.

DIY NOVELTY TRAY AND PIGGY BANK

Start of with finding the pieces you want to decorate. Make sure to thoroughly clean and let them dry. Some materials are more porous and will need to dry over night. This step is SUPER important. Often ceramic and porcelain products are covered in a film or dirt and the paint won't properly stick unless it's clean. 

Choose your paint colours. We used the paint below and bought a thinner because I didn't want it to go on too thick. 

6A84A5ED-F954-4E18-8170-037B274DB5D2-Facetune-08-05-2018-20-51-37.jpg

Optional: Paint Brush - You'll need one if you decide to write something on the jar or piggy bank (such as the date, your child's name etc.). I also used a thick paint brush to paint on my son's hands and feet. You could also just mix the paint in a bowl and press their hand/foot in it.

Once your tray is clean and dry, map out the design you want. You want to know EXACTLY where you're putting your mini's hand or foot once it's covered in paint because it won't be fun trying to keep them still if they're younger. I recommend doing this project with someone else so that one of you can place the foot or hand in paint and make the print and the other can stop your baby from crawling away covered in paint. 

Follow the directions on your ceramic paint. If you used the same one as I did, let it dry overnight, then bake for 35 mins at 150 degrees. Then it's ready to package and send off!

Tips: Definitely find a place to date your artwork. It's always nice to look back and see when the art project was made. I definitely recommend doing the hand print before the decorating because it's the hardest part. I needed to wash off my son's handprint several times before getting one that was perfect and the rest of the design would have been ruined had I done it first!

IMG-0092-Facetune-08-05-2018-20-42-40.jpg
IMG-0095-Facetune-08-05-2018-20-46-53.jpg
IMG-0093-Facetune-08-05-2018-20-47-04.jpg

Happy Crafting! I would love to see the artwork you create so don't forget to tag me in your posts! @mrsnewmommtl


xox Tovah


DIY Candy Jar for a Sweetie in Your Life

Zane and I have recently been loving DIY crafts (ok mostly me but he'll love having these keepsakes one day :)). With a husband who has everything, it's getting harder and harder to surprise him with little gifts every now and then, so a personalized gift from Zane is always sure to be a hit! With Valentine's day just around the corner, I thought it would be so cute to make my husband a personalized candy jar for his office filled with candy as sweet at him! You could also do variations of this craft by personalizing a candy bowl or a cookie jar and filling it with delicious sweets :)

What we used: 

  • Ceramic candy jar (you can also use a candy bowl or cookie jar)
  • Acrylic paint
  • Paint brush
  • Marking tape (optional)
  • Rubber or latex gloves (optional)

1. Mark the jar with the pattern you want using the marking tape.

2. Choose the colour you want for your hand print, add some paint on a plate and get your mini ready! It helps if you have 2 people coordinating this part :) This is the step where you want to put on your rubber gloves if you've opted to use them because although the paint will wash off your hands, it did not come off my nail polish. Place your baby's hand palm down in the paint and make sure it's well coated. Place your baby's hand flat on the jar to get a perfect print! 

** I recommend doing the hand print before painting the jar because you don't get a print that you like the first time (it took us 4 times), you can use water to wash it off and to start over without worrying about ruining the rest of the design!

3. Paint the rest of your jar however you want! If you are using multiple coats of paint, be sure to wait at least 30 mins between each coat to make sure it dries. We chose to add Zane's initials to the jar and to put the date inside the lid so that we will always know how old he was when he made it!

4. Preheat oven to 350 F

IMG_0849.JPG
IMG_0850.JPG

5. If you used marking tape, remove the marking slowly (if you pull too fast it may remove some paint) and fill in any gaps you may have or uneven edges!

6. Put your jar directly on your oven rack OR on a parchment covered baking sheet and bake for 30-35 mins. 

7. Let cool and then fill with your fave candy or sweets!

My recommendation for doing this craft with young babies: Do it with them only wearing a diaper - it makes cleaning up the mess much easier. Have the craft sitting beside your kitchen sink so that the minute you finish with the print you can wash the paint off of them before they get it anywhere else. This craft was super easy, inexpensive (under $20 total) and I know my husband will love his surprise - and I'm sure his colleagues will too now that's filled with delicious candy :). 

My Fave 5 DIY Gift Ideas for Babies and Toddlers

My fave holiday is just around the corner (and no it's not my fave because of the chocolate.... ok well maybe it's because of the chocolate), but this year I'm loving it so much more because of all the fun crafts I get to do with Zane! There is nothing sweeter than giving someone you love a DIY made by someone else you love! Below are my fave 5 DIY Baby and Toddler Valentine's Day Gift Ideas!

1. Finger Print Key Chain or Necklace

IMG_9911.JPG

I got this idea from The Crafty Crow who originally posted a tutorial for Mother's Day. I changed a few of the steps and decided to make a keychain instead of a necklace because I wasn't sure a bright pink heart necklace would match with my husband's suit every day at work LOL.

What you'll need: 

  • Oven baking clay (in whatever colours you want!)
  • Keychain rings (or a chain or rope if you want to make it into a necklace)
  • Cookie cutters
  • Skewer to poke a hole
  • Rolling pin
  • Baking sheet
IMG_9910.JPG

Directions: 

  1. Take your baking clay and roll it out to the thickness you want (I made mine 1/6 inch thick)
  2. Cut out your shape with a cookie cutter
  3. Grab your mini and press their thumb down in the clay until you get a clear fingerprint impression (this may take a few tries... especially if you have a mover like I do)
  4. Take the skewer to make a hole in the heart (where you want to insert the keychain ring or chain for a necklace)
  5. Place the clay on a baking sheet
  6. Follow baking instructions on the package of the clay
  7. Once cooled, insert your keychain ring and you're done!

2. Footprint Canvas Art

IMG_0074.JPG

I found this idea on The Mommy Nichols. She's known for her awesome DIY projects and easy recipes... and this craft is no exception. With our little ones growing up so quickly, what better keepsake than a piece of art with their itty bitty tiny feet? I love how easy, quick and beautiful this canvas craft is! Click here to visit The Mommy Nichols website and get this craft started! Follow her on Instagram for more awesome craft ideas all year long!

3. Abstract Art

DIY Abstract Art.jpg
DIY Abstract 2.jpg

This is such an easy craft to do and your little one, no matter what their age, will have SO much fun doing it! You can choose whatever colours you want and the fact that it makes no mess is a bonus! It's a keepsake that you can hang anywhere in your home! Click here to see my blog post about it. 

4. Love Bug Finger Print Art

LoveBugs.jpg

I got this idea from I Heart Arts and Crafts. I think it's such a cute craft for older kids who know how to use scissors and can use glue. This is such a sweet idea and I love that your children will be able to do it all on their own. I recommend using washable paint or protecting your arts & craft area with plastic so that once they dip their fingers in paint you don't have the paint everywhere :) Click here to visit I Heart Arts and Crafts to see the full tutorial for this DIY.

5. Kid Made Jewelry Dish

jewelrydish1.jpg

This last idea came from Inner Child Fun. This is definitely a craft for your older kids (unless you want to do it yourself lol). It requires very few things to buy and it's something that any Mom or Grandma will love. Your kids will have so much fun doing it and will love that their mom can use it every day! You can also do variations of this craft depending on who the gift is for - you can make a ring bowl, a candy bowl, decorative bowl for your home... the possibilities are endless! Click here to visit Inner Child Fun to make your own jewelry dish!  

I can't wait to see which you end up trying! Make sure to tag me in your posts on Instagram so I can see your finish product :)